New found interest – Graffiti

This Sunday morning, I was feeling a little wobbly. I easily get bored when I run out of fun activities. So today, I literally had whole day to myself without any concrete plans. I wondered how to make it exciting. Just then, a random idea stuck. Lets try doing some graffiti!

My handwriting sucks. I have literally zero drawing and painting skills. The last encounter that I remember with any sort of artsy drawing was in standard 5th, where I scored a respectable 6/10 for drawing a Mango tree, next to a flowing river. I colored the river purple. Yeah I was a rebel since beginning 😀

Back to present. I live in a rented apartment, so naturally I did not have the liberty to go all guns and smudge the interior walls with spray paints. However, what I could do was to use my makeshift whiteboard, which I otherwise use to write code and brainstorm, as a graffiti wall.

Now all that was left was to find an appropriate piece of art that is witty, uplifting and easy for a first timer. I found an interesting sketch of three kids with cute looks, ruffled hair and some mischief brewing in their mind. Just apt!

I used a blue marker to get started. It was a bit difficult in the beginning. I had to edit and erase the initial few curves. But soon I got the hang of it. I stated enjoying it! In less than ten mins I was done sketching the three kids. Here it is below [the left side].

Be Yourself Graffiti


Since I completed the graffiti fairly quickly, I felt a little undeserving. To compensate for it, I found another interesting image from Calvin and Hobbes, where Calvin is having a gala time listening to his boom box. I inserted it into my debutant graffiti art as well.

After finishing, I admired it for a few minutes and indulged myself into some unabashed self appraisal 😀 . I throughly enjoyed the whole experience of trying out a new skill. I promised myself to try a new graffiti every week.

“Skill#28 – A veteran Graffiti artist” soon-to-inserted-in-my-resume.

Bring Backgroud processes to foreground in terminal

If you are using Terminal and have sent some processes to background using Control+Z, use the following commands to bring them back to foreground.

Type ps -a to view all background processes with pid. Or type only jobs, to view them in order.

Type fg to bring the last process back to foreground.

If you have more than one process running in the background, do this:

$ jobs
[1] Stopped python
[2]- Stopped python
[3]+ Stopped python

Type fg %3 to send the python process back to foreground.

To suspend the process running in the background, use:

kill -19 %job_id.
the -19 signal is SIGSTOP (the signal sent by Control - Z) .

example: kill -19 %3.

To kill a python process either type exit() in python shell, or type Control+D

Common git commands to use

Here are a common git commands that I end up using pretty frequently. Will keep on updating this list

  1. List all remote branches
  2. Simplest is git branch -a Shows all remote and local branches. git branch -r Will show all remote branches only.
    Another way is to use git remote feature like:
    git remote show origin This shows all branches on remote and how they corelate with local repo.
    git ls-remote Will meticulously list all branches and tags.

  3. Just view modified files between 2 branches (without diff)
  4. git diff --name-status master..branch Will list out only filenames git diff master..branch without –name-status will show whole diff.

  5. git remote -v Displays url of remote repo from where local git was pulled
  6. Alternatively use git remote show origin or git config --get remote.origin.url

  7. Viewing Unpushed Git Commits
  8. git log origin/master..HEAD
    To view diffs: git diff origin/master..HEAD
    Another way: git log @{u}..

Handy commands in Mac/Linux systems

Here’s a list of common commands I use in Linux. I will continue to update this list with more stuff.

  1. Checking fireball logs:
  2. [code lang=”bash” gutter=”false”]
    cat /var/log/appfirewall.log

    # You will see stuff like
    Jun 21 10:37:51 prakhars-MacBook-Pro Firewall[90]: postgres is listening from 0.0.0.0:5432 proto=6
    Jun 21 10:38:11 prakhars-MacBook-Pro Firewall[90]: mysqld is listening from ::ffff:0.0.0.0:3306 proto=6
    Jun 21 10:40:21 prakhars-MacBook-Pro Firewall[90]: Dropbox is listening from 0.0.0.0:17500 proto=6
    Jun 21 10:40:21 prakhars-MacBook-Pro Firewall[90]: java is listening from ::ffff:0.0.0.0:0 proto=6
    Jun 21 10:44:38 prakhars-MacBook-Pro Firewall[90]: GoogleTalkPlugin is listening from 127.0.0.1:49198 proto=6
    Jun 21 10:45:35 prakhars-MacBook-Pro Firewall[90]: python is listening from 127.0.0.1:8000 proto=6
    [/code]

  3. screen command: Use it to create parallel sessions in terminal. Useful for running long processes on remote servers even after signing out of server.Usage:
    [code lang=”bash”]
    screen
    # This creates a separate screen.

    screen -ls
    #lists all attached/detached screens IDs

    screen -x 13152
    # Enter (Attach) screen ID 13152 (just an example, can be any ID number)

    echo $STY
    # Displays current screen ID you are working in.
    [/code]
    Ctrl-a d Detach from current screen.

  4. dpkg --get-selections List all installed packages. (Only on debian systems like Ubuntu which support apt-get)
    Smartly grep to find package you are looking for eg- dpkg --get-selections | grep mysql

Using Django using VirtualEnv on MAC. Fast forward installation.

This is a fast forward tutorial which will guide you through django installation on virtualenv. Detailed installation instructions using source codes can be found on respective package’s official site.

Pre- Requirements:
Make sure you have easy_install on MAC
Install pip using easy_install pip

1) Installing Virtualenv: Run following lines in terminal:

[code lang=”bash” gutter=”false”]
pip install virtualenv
pip install virtualenvwrapper

# Use a text editor to edit .profile and Insert following lines. Eg using vim:
# $ vim .profile
export WORKON_HOME=$HOME/.virtualenvs
export PROJECT_HOME=$HOME/Devel
source /usr/local/bin/virtualenvwrapper.sh

# Now open a new terminal window and Type:
mkvirtualenv myfirstproject

# You will see something like:
(myfirstproject) $

# This means you are now working isolatedly in myfirstproject
# The location of this project is ~/.virtualenvs/myfirstproject
[/code]

2) Installing Django and South:

[code lang=”bash” gutter=”false”]

# [info] Make sure you are inside myfirstproject:
# $ workon myfirstproject
# Now run in terminal:

pip install Django
pip install south

# This installs Django in: .virtualenvs/myfirstproject/lib/python2.6/site-packages/django/

[/code]

3) Starting first django project:

  • [info] Type workon myfirstproject if you are not already in your virtual environment.
  • [info] you can directly go to your site packages dir by typing cdsitepackages
  • [info] can check the location of django-admin by which django-admin.py
  • Initiating django project now. Assuming you are at .virtualenvs/myfirstproject/ Type:
  • django-admin.py startproject mydjangoproject
  • This will start your first django project.
  • Now start server by
  • python manage.py runserver Default port is 8000. If you have to change port, just write port number after runserver
  • Now, Visit browser at localhost:8000
  • Congrats, we have just installed a basic django app.

Display file permissions as octal number in ls command

Normally, in *nix systems like Linux, mac the file permissions are displayed as symbolic notations. So when doing a ls -l in a directory you’ll see drwxr-xr-x+ like symbolic permissions next to a directory. This is equivalent to 755 in octal permissions. I find octal permissions easier to grasp and understand. Unfortunately, there is no native switch in ls to show octal permissions. So here is a little custom command that will do the needful.

[code lang=”bash”]
ls -l | awk ‘{k=0;for(i=0;i<=8;i++)k+=((substr($1,i+2,1)~/[rwx]/)*2^(8-i));if(k)printf("%0o ",k);print}’
[/code]

This command will show octal file permissions before its symbolic representation.

If you find it impressive and would like to bookmark it, just add this line in your ~/.profile or ~/.bash_profile (depending on mac or linux) using your favorite editor (I’d use vim).

[code lang=”bash”]
alias l= "ls -la | awk ‘{k=0;for(i=0;i<=8;i++)k+=((substr(\$1,i+2,1)~/[rwx]/)*2^(8-i));if(k)printf(\" %0o \",k);print}’"
[/code]

We have just escaped $ and " with a \ in above line.

Some under-the-hood details: This command works by piping the output of ls -l to awk as its input. awk is a pattern directed scanning and processing language. For more info you can do man awk which shows:

Awk scans each input file for lines that match any of a set of patterns specified literally in prog or in one or more files specified as -f progfile. With
each pattern there can be an associated action that will be performed when a line of a file matches the pattern. Each line is matched against the pattern
portion of every pattern-action statement; the associated action is performed for each matched pattern. The file name – means the standard input. Any file
of the form var=value is treated as an assignment, not a filename, and is executed at the time it would have been opened if it were a filename. The option
-v followed by var=value is an assignment to be done before prog is executed; any number of -v options may be present. The -F fs option defines the input
field separator to be the regular expression fs.

An input line is normally made up of fields separated by white space, or by regular expression FS. The fields are denoted $1, $2, …, while $0 refers to
the entire line. If FS is null, the input line is split into one field per character.

A pattern-action statement has the form

pattern { action }

A missing { action } means print the line; a missing pattern always matches. Pattern-action statements are separated by newlines or semicolons.

MAC View file transfer speeds while copying

Often while copying large files from external hard disks, you want to see the transfer rates. MAC natively doesn’t show the transfer speed. However there’s a workaround:

1) open Terminal and write:

[code lang=”bash” light=”true”]
while true ; do iostat -w 2 ; done
[/code]

This will show real-time data transfer speed of all mounted disks. Like:
[code lang=”bash” light=”true”]
$ while true ; do iostat -w 2 ; done
disk0 disk1 cpu load average
KB/t tps MB/s KB/t tps MB/s us sy id 1m 5m 15m
71.23 134 9.35 44.69 45 1.96 21 22 58 1.61 1.94 1.90
70.61 237 16.33 66.18 169 10.95 8 30 63 1.48 1.91 1.88
77.30 109 8.22 16.09 605 9.50 8 33 59 1.48 1.91 1.88
385.81 20 7.53 21.54 449 9.44 8 28 64 1.44 1.89 1.88
243.28 17 4.04 14.09 319 4.39 7 26 67 1.44 1.89 1.88
[/code]

HTML encode text in javascript simple shortcut

Recently, I wanted to obfuscate HTML text for some reasons. I found this link http://www.voormedia.com/en/tools/html-obfuscate-scrambler.php
for scrambling text.

My HTML document was:

[code lang=”html”]
<div id=”pictures”>
<h2>Exterior</h2>
<a class=”hyperlinks” href=”link”> link1 inside Exterior</a>
<a class=”hyperlinks” href=”link”> link2 inside Exterior</a>
<a class=”hyperlinks” href=”link”> link3 inside Exterior</a>
<h2>Interior</h2>
<a class=”hyperlinks” href=”link”> link1 inside Interior</a>
<a class=”hyperlinks” href=”link”> link2 inside Interior</a>
<a class=”hyperlinks” href=”link”> link3 inside Interior</a>
<a class=”hyperlinks” href=”link”> link4 inside Interior</a>
<h2>Specific text 3</h2>
<a class=”hyperlinks” href=”link”> link1 inside specific text 3</a>
<a class=”hyperlinks” href=”link”> link2 inside specific text 3</a>
</div>
[/code]

The obfuscated code generated by http://www.voormedia.com/en/tools/html-obfuscate-scrambler.php:

[code lang=”js”]
<script type=”text/javascript” language=”JavaScript”>
var i,y,x=”3c6469762069643d22736f6d656964223e0d0a202020203c68323e5370656369666963207465787420313c2f68323e0d0a202020203c6120636c6173733d2268797065726c696e6b732220687265663d226c696e6b223e206c696e6b3120696e73696465207370656369666963207465787420313c2f613e0d0a202020203c6120636c6173733d2268797065726c696e6b732220687265663d226c696e6b223e206c696e6b3220696e73696465207370656369666963207465787420313c2f613e0d0a202020203c6120636c6173733d2268797065726c696e6b732220687265663d226c696e6b223e206c696e6b3320696e73696465207370656369666963207465787420313c2f613e0d0a0d0a202020203c68323e5370656369666963207465787420323c2f68323e0d0a202020203c6120636c6173733d2268797065726c696e6b732220687265663d226c696e6b223e206c696e6b3120696e73696465207370656369666963207465787420323c2f613e0d0a202020203c6120636c6173733d2268797065726c696e6b732220687265663d226c696e6b223e206c696e6b3220696e73696465207370656369666963207465787420323c2f613e0d0a202020203c6120636c6173733d2268797065726c696e6b732220687265663d226c696e6b223e206c696e6b3320696e73696465207370656369666963207465787420323c2f613e0d0a202020203c6120636c6173733d2268797065726c696e6b732220687265663d226c696e6b223e206c696e6b3420696e73696465207370656369666963207465787420323c2f613e0d0a0d0a202020203c68323e5370656369666963207465787420333c2f68323e0d0a202020203c6120636c6173733d2268797065726c696e6b732220687265663d226c696e6b223e206c696e6b3120696e73696465207370656369666963207465787420333c2f613e0d0a202020203c6120636c6173733d2268797065726c696e6b732220687265663d226c696e6b223e206c696e6b3220696e73696465207370656369666963207465787420333c2f613e2020202020202020200d0a0d0a3c2f6469763e”;
y=”;
for(i=0;i<x.length;i+=2)
{y+=unescape(‘%’+x.substr(i,2));}
document.write(y);
</script>
[/code]

Basically the obfuscation script thinly disguised each character as hexadecimal value and puked out the unescaped version via a simple document.write js call.

Now, I decided to deobfuscate this obfuscated code. For this, I needed to HTML encode the value of “y” before passing it to document.write(). To my surprise, there is no native HTML encode function in javascript. Apparently, there is not much use of HTML encode function as its assumed that all HTML encoding comes from server side itself. But you can clearly feel its requirement if you are a pro developer, as illustrated in this example here.

Fortunately, a tweaked version of HTML encode can be constructed by appending normal unescaped string inside text node of a psuedo div element. Then returning the innerhtml of this div.
Here is the function code:

[code lang=”js”]
<script type=”text/javascript” language=”JavaScript”>
function HTMLencode(value)
{
var div = document.createElement(‘div’);
var text = document.createTextNode(value);
div.appendChild(text);
return div.innerHTML;
}
</script>
[/code]

Finally, here’s the complete code to deobfuscate:

[code lang=”js”]
<script type=”text/javascript” language=”JavaScript”>
function HTMLencode(value)
{
var div = document.createElement(‘div’);
var text = document.createTextNode(value);
div.appendChild(text);
return div.innerHTML;
}

var i,y,x=”3c6469762069643d22736f6d656964223e0d0a202020203c68323e5370656369666963207465787420313c2f68323e0d0a202020203c6120636c6173733d2268797065726c696e6b732220687265663d226c696e6b223e206c696e6b3120696e73696465207370656369666963207465787420313c2f613e0d0a202020203c6120636c6173733d2268797065726c696e6b732220687265663d226c696e6b223e206c696e6b3220696e73696465207370656369666963207465787420313c2f613e0d0a202020203c6120636c6173733d2268797065726c696e6b732220687265663d226c696e6b223e206c696e6b3320696e73696465207370656369666963207465787420313c2f613e0d0a0d0a202020203c68323e5370656369666963207465787420323c2f68323e0d0a202020203c6120636c6173733d2268797065726c696e6b732220687265663d226c696e6b223e206c696e6b3120696e73696465207370656369666963207465787420323c2f613e0d0a202020203c6120636c6173733d2268797065726c696e6b732220687265663d226c696e6b223e206c696e6b3220696e73696465207370656369666963207465787420323c2f613e0d0a202020203c6120636c6173733d2268797065726c696e6b732220687265663d226c696e6b223e206c696e6b3320696e73696465207370656369666963207465787420323c2f613e0d0a202020203c6120636c6173733d2268797065726c696e6b732220687265663d226c696e6b223e206c696e6b3420696e73696465207370656369666963207465787420323c2f613e0d0a0d0a202020203c68323e5370656369666963207465787420333c2f68323e0d0a202020203c6120636c6173733d2268797065726c696e6b732220687265663d226c696e6b223e206c696e6b3120696e73696465207370656369666963207465787420333c2f613e0d0a202020203c6120636c6173733d2268797065726c696e6b732220687265663d226c696e6b223e206c696e6b3220696e73696465207370656369666963207465787420333c2f613e2020202020202020200d0a0d0a3c2f6469763e”;
y=”;
for(i=0;i<x.length;i+=2)
{y+=unescape(‘%’+x.substr(i,2));}
document.write(HTMLencode(y));
</script>
[/code]

Changing Orientation in Iphone simulator from Portrait to Landscape

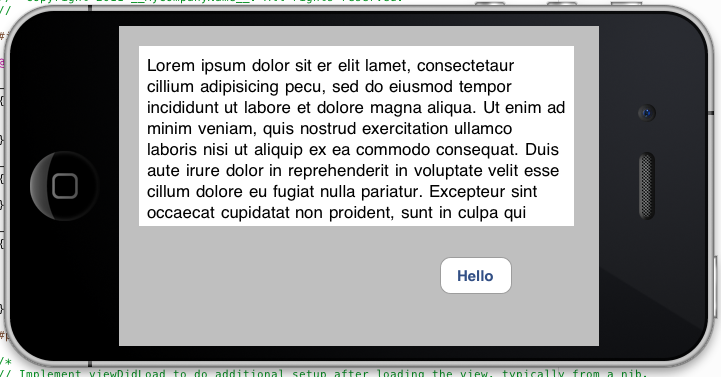
While writing my app for iOS 4 in XCode 4, I faced this situation of changing orientations from Portrait to landscape and vice-versa. This initially appeared like cake-walk to me, something which could be done with a flip of a button. Obviously I was wrong!

I tried referring to http://stackoverflow.com/questions/475553/how-can-i-test-landscape-view-using-the-iphone-simulator but this thread landed me nowhere, hence I decided to write this tutorial myself.

Assumptions

1) You are using Xcode 4

2) You want to design app in Landscape Mode

3) Your project name is "Something"

Steps

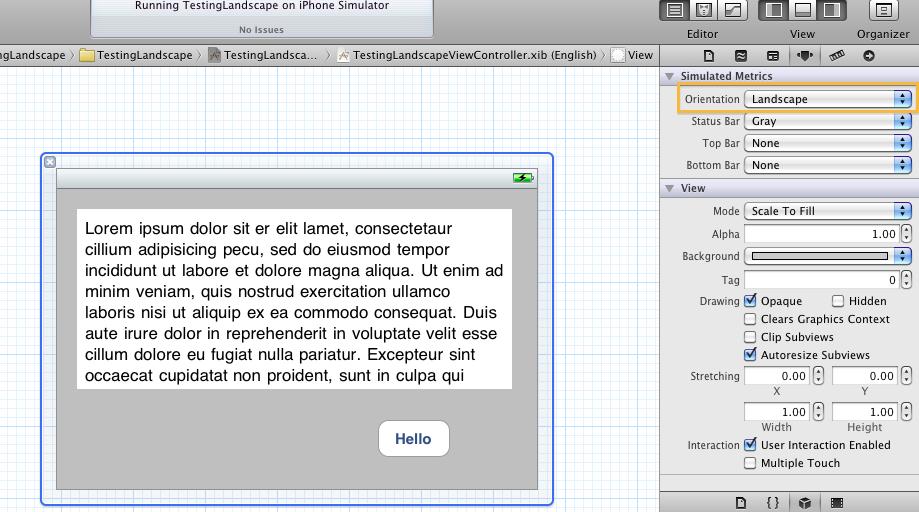
1) In your SomethingAppViewController.xib file, select view (blue outline of barebones iphone screen) and goto Attributes Inspector on the Right. Change Orientation to Landscape.

Orientation = Landscape


2) Goto Something-Info.plist inside Supporting Files and add a new row (right click in table and select "add row"). Choose "Initial Interface Orientation" and set its value as "Landscape (left home button)". [optional] If you also want to hide the status bar (where battery, carrier info etc re displayed) from the phone screen, then select "Status bar is initially hidden" as "YES"

changing orientation in info plist


3) We are almost there. Now if you'll run the project you will observe that the device is rotated, but the content still remains in portrait mode. You must be asking "Is there a way to rotate the content also?" Ofcourse there is and that is our third and last step. Goto SomethingViewController.m file and locate the function shouldAutorotateToInterfaceOrientation. Change "UIInterfaceOrientationPortrait" to "UIInterfaceOrientationLandscapeLeft".

changing interfaceOrientation


4) Thats it, there is no step 4! You should see the orientation changed successfully!


Final screenshot


Let me know in case of any troubles 🙂